Sigma SD1 and adapted lenses: Cornerfix to the rescue
So… we all know that the Sigma SD1 Merrill, that beast of a foveon DSLR, can't handle adapted lenses, right?
Right?
What exactly goes wrong, you may ask? Chromatic vignetting. Really, really nasty color casts, with up to half of the frame taken up by green and magenta color that just absolutely does not belong.
The explanation goes like this: Those lenses weren't made for the Merrill sensor, which is a delicate multi-layered instrument, and the Merrill sensor — and its very hard-core onboard processing software —wasn't made for those lenses.
This Japanese blogger points out that the same thing happens if you loosely mount a Sigma brand lens, so the Merrill can't read the lens information and correct for it. Ha!
Sadly, it's ugly as hell. Look what it's done to an otherwise pleasing cat portrait with the Micro Nikkor 55mm:

If you're thinking, "Huh. That both looks and sounds like the issues that mirrorless full-frame digital cameras have with super wide angle vintage lenses," you're right!
And after I wrote my piece on how the Sigma fp deals with just that very issue, I had a brainwave:
What if I could use flatfield corrections on SD1 Merrill images??
You see, aside from the fact that the Merrill has these processing aberrations with every adapted lens rather than merely ultra-wides, the issue is the same.
The Experiment: Setting up
Today I finally had some energy again — and I desperately needed a pick-me-up — so I hunted down my Nikon F to Pentax macro adapter and plopped on my $17 Vivitar 28mm/2.8 Close Focus lens. Just because I felt daring. Or, rather, I felt like spitting in Fate's eye and seeing what happened.
Have I ever mentioned what an absolute beast the SD1 Merrill is? And when I say "beast," I'm not complimenting it; I'm not a frat boy, I am a grown woman. The SD1 is heavy. It's slooooooooow. And it doesn't have dials for controls, but a software interface… a software interface designed in the dark ages.
But I made it work. Eventually. With wailing and gnashing of teeth. And slowly going insane while the little red light blinked for 30-45 seconds after every shot…
Using a white t-shirt and a hair tie, the bright blue sky and my husband's increasingly annoyed/annoying instructions, the first picture I took was a flatfield image.
It looked like this:

Gross… I really need to clean that sensor cover. (It came dirty and I forgot!)
And then I tried (mostly in vain) to take correctly exposed, focused, not-camera-shakey shots with the Merrill. Which is much much harder than with any other camera, believe you me, because the Bayer interpolation is friendly and hides a lot of sins that the Merrill's unrelenting sharpness will cruelly reveal.
The images
This was the only real keeper:

Damn but does the foveon do gorgeous black & white.
But we're talking about color and particularly unwanted color.
So here's the original in all its glory:

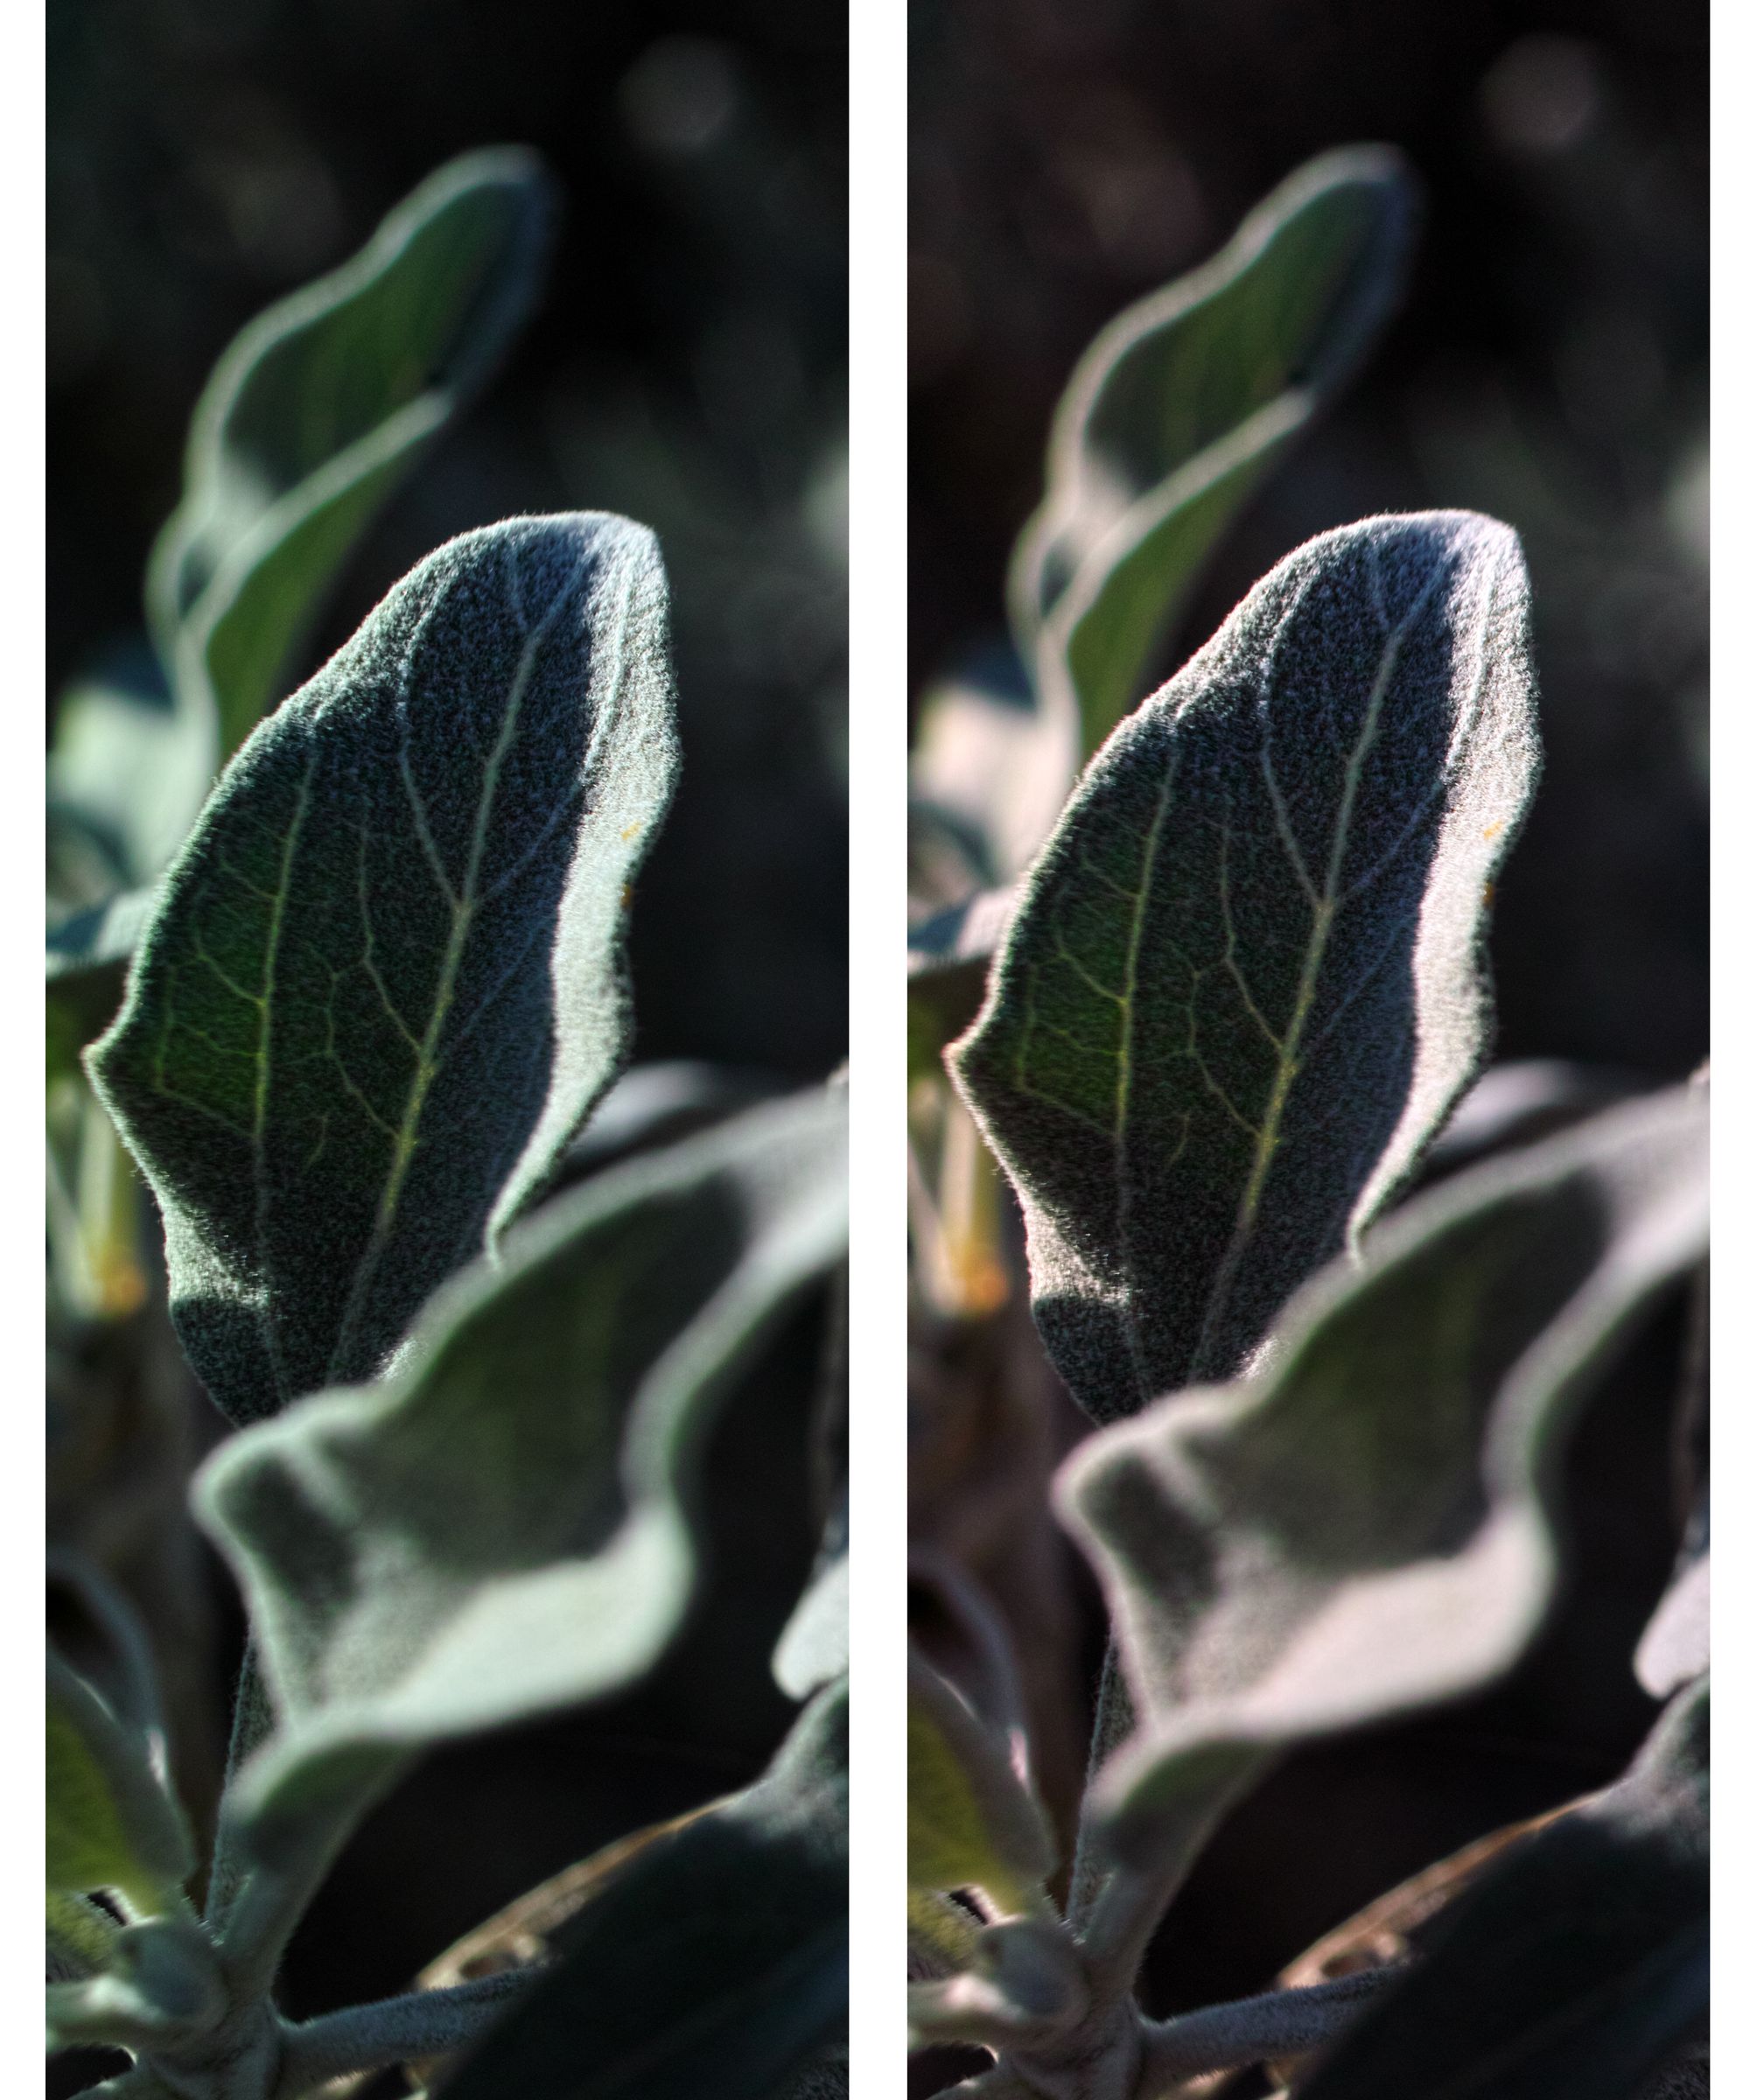
It's not glaring at first because the subject is green and the center colors look so good — but if you direct your attention to the left quarter and top right corner you'll see a minty electric green vignette.
The processing
I downloaded Cornerfix. I'd read about it while researching how to use wide rangefinder lenses on FF bodies.
I knew it wouldn't open x3f files (nothing does!) so I used the SPP Photoshop plugin to export them to TIFF.
But Cornerfix won't open TIFF… only DNG.
It took a while to figure out how to get DNGs from X3Fs:
- Open X3F in the Sigma Photo Pro plugin in Photoshop
- Save as TIFF
- Import TIFF into Lightroom
- Export as DNG (using the File > Export with Preset menu; I tried another way and it didn't work in Cornerfix)
Turns out I could've just used Adobe Digital Negative Converter to convert X3Fs directly… but you live and learn. I'll have to test it to see if it handles the files as well as SPP.
Then I created a new Cornerfix lens profile using my flat file dng.
Then I opened the overly-minty leaves photo dng.
Then magic happened.

It's completely fixed! What a difference!
Let's compare the before & after, shall we?
Conclusion
In my initial search, I could find virtually nothing on using Cornerfix to correct for lenses on the SD1 Merrill. People mentioned it offhandedly — "Try it and report back!" — but that was about it. I saw one person say it doesn't work on wide angle lenses (my 28mm begs to differ).
So here I have documented the process and the fact that:
- It works!
- It works easily
- Cornerfix does batch processing
- Adobe Digital Negative Converter should make it possible to batch DNG conversion so I can then batch in Cornerfix
All things considered… this is relatively painless!
And, on his blog, the Cornerfix guy reports that it's rarely if ever required to take a new flatfield image when you change aperture, focus or even subject/lighting situation. Of course he's referring to using lenses on a Leica M9, so perhaps that doesn't apply to the SD1. I'll have to try it out.
I can't wait to try my Micro Nikkor again, and get my M42 adapter in the mail!